Maxi-Phyling Settings
Maxi-Phyling Settings
Introduction
There are three ways to access the Maxi-Phyling settings. All three give you access to the configuration, calibration and WiFi settings in any circumstances.
- Via the Cloud Application: On the Phyling cloud application, in the "Real Time" tab, click the ... button then Settings. The settings menu contains a tab for the Maxi-Phyling configuration, a tab for sensor calibration, a tab to update the Maxi-Phyling and a tab to manage the Maxi-Phyling WiFi networks.
- Hotspot mode: The Hotspot mode lets you access the Maxi-Phyling settings wirelessly when it has no access to a WiFi network. The interface is similar to the cloud application to simplify the settings.
- USB mode: The USB mode lets you access the Maxi-Phyling settings through a wired connection. The interface is raw, so we recommend contacting the Phyling team to avoid configuration mistakes.
Maxi-Phyling configuration
From the application, in the real-time tab, click the ... button then Settings. The configuration menu then appears as shown below.
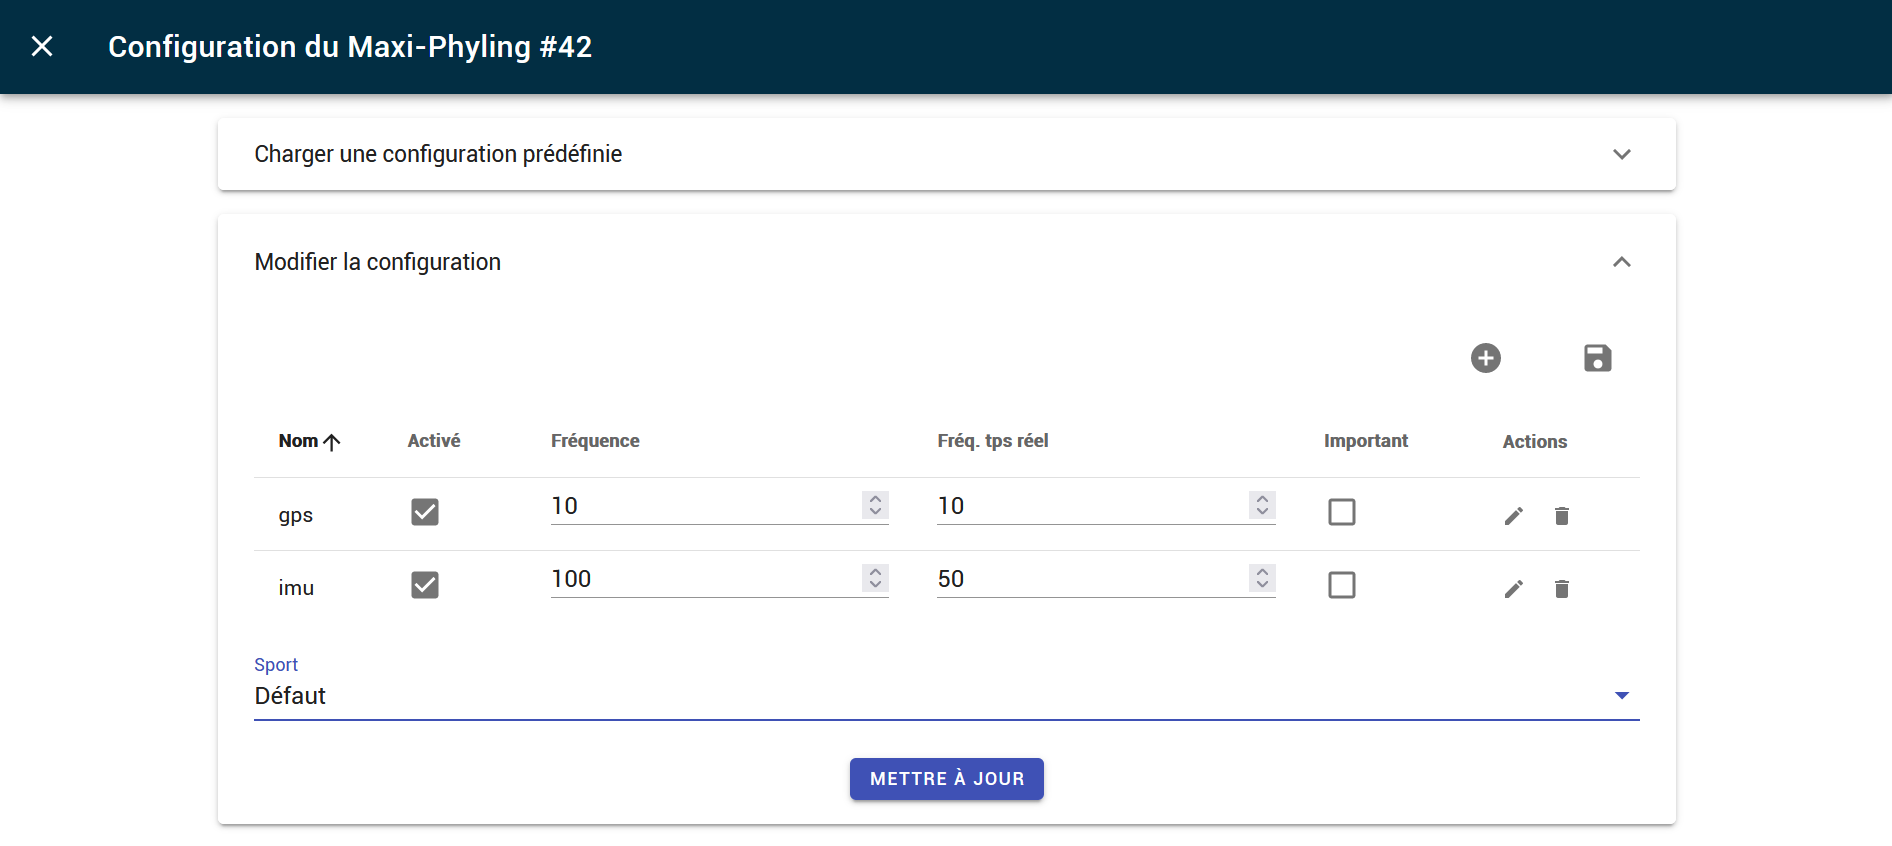
You can then define the various sensors of the Maxi-Phyling, as well as the sport used for data analysis. To add a sensor, click the + button, select the sensor from the list and fill in the required parameters.
- Mini-Phyling V2 sensor (
>= 362): Simply add aminiphyling-v2sensor. On first connection, the Maxi-Phyling restarts and applies the specific Mini-Phyling configuration. - Mini-Phyling V1 sensor (
< 362): Display the advanced sensors and select your specific sensor (crankset, oar, etc.). Be careful: the full name with all the leading zeros before the number matters. - Polar heart rate sensor: The Hub must detect the sensor in order to find its characteristics and send them to the Maxi-Phyling. Make sure to turn the sensor on next to the Hub during the procedure.
- Wired sensor: Connecting it is not enough; you must also set the sensor type and the connector used in the configuration.
- Wired synchronization: Add the desired synchronization module as if it were a sensor in the Maxi-Phyling configuration.
A sensor can be defined as "Important". This means that it is important for the measurement that the sensor is connected and working. The Maxi-Phyling LED blinks until all sensors defined as important are connected. For example, if the GPS is defined as important, the LED will blink until there is a reliable GPS signal.
Saving configurations
Once a configuration has been set up on a Maxi-Phyling, you can save it in the Hub so that you can reload it later. For example, if an athlete has a specific configuration, you can save it under their name, then reload it when they use the Maxi-Phyling. The list of saved configurations is available in the Configurations section of the Settings tab.
Calibration
The sensors of a Maxi-Phyling can be calibrated using a predefined calibration procedure by clicking the settings button on the right of the Maxi-Phyling control panel. Once the sensor to calibrate and the calibration type are chosen, simply follow the instructions displayed on screen.
The calibration is then available from the Maxi-Phyling Settings menu (in the real-time tab, click the ... button of a Maxi-Phyling, then select Settings).
The calibration of a recording is defined by a json file that generally looks like the file below:
{
  "<moduleName>": {
    "<varName>": {
      "coef": 0.333,
      "offset": 0
    }
  }
}
where moduleName is the name of the sensor (for example imu) and varName is the name of the variable to calibrate (for example acc_x). The values of and are applied with the following formula to convert raw data into calibrated data:
that is:
3-axis calibration
In some cases, such as the calibration of IMUs or PI3D pedals, is a 3x3 matrix and is a vector of size 3, as here for the calibration of gyro data:
{
  "imu": {
    "gyro": {
      "coef": [
        [
          1,
          0,
          0
        ],
        [
          0,
          1,
          0
        ],
        [
          0,
          0,
          1
        ]
      ],
      "offset": [
        -1.737,
        1.473,
        1.471
      ]
    }
  }
}
The same calibration formula then applies, but on vector data .
High Range Gyro calibration
For a simple rotation movement, the "High Range Gyro" calibration extends the angular velocity measurement range by combining gyro and accelerometer data. The calibration has a different form:
{
  "imu": {
    "high_range_gyro": {
      "coef": 299.08,
      "col_acc": "acc_x",
      "col_gyro": "gyro_y"
    }
  }
}
The value of is used to recompute the angular velocity col_gyro beyond the saturation value (typically 2000 deg/s) using the acceleration col_acc according to the following formula:
where is the acceleration filtered with a moving average.
In the particular case where "coef": null,, the value of is computed directly from the recording data.
Update
Only available via the Phyling cloud application with a Maxi-Phyling connected to the application in the Real Time tab. Click the ... button then Settings then Advanced Settings.
When an update is detected for your Maxi-Phyling, a red dot appears on the ... of the Maxi-Phyling in the Real Time tab.
To perform the update, select the version with the highest numbers, which corresponds to the most recent version. Updates bring fixes and improvements, both visible and invisible to users. 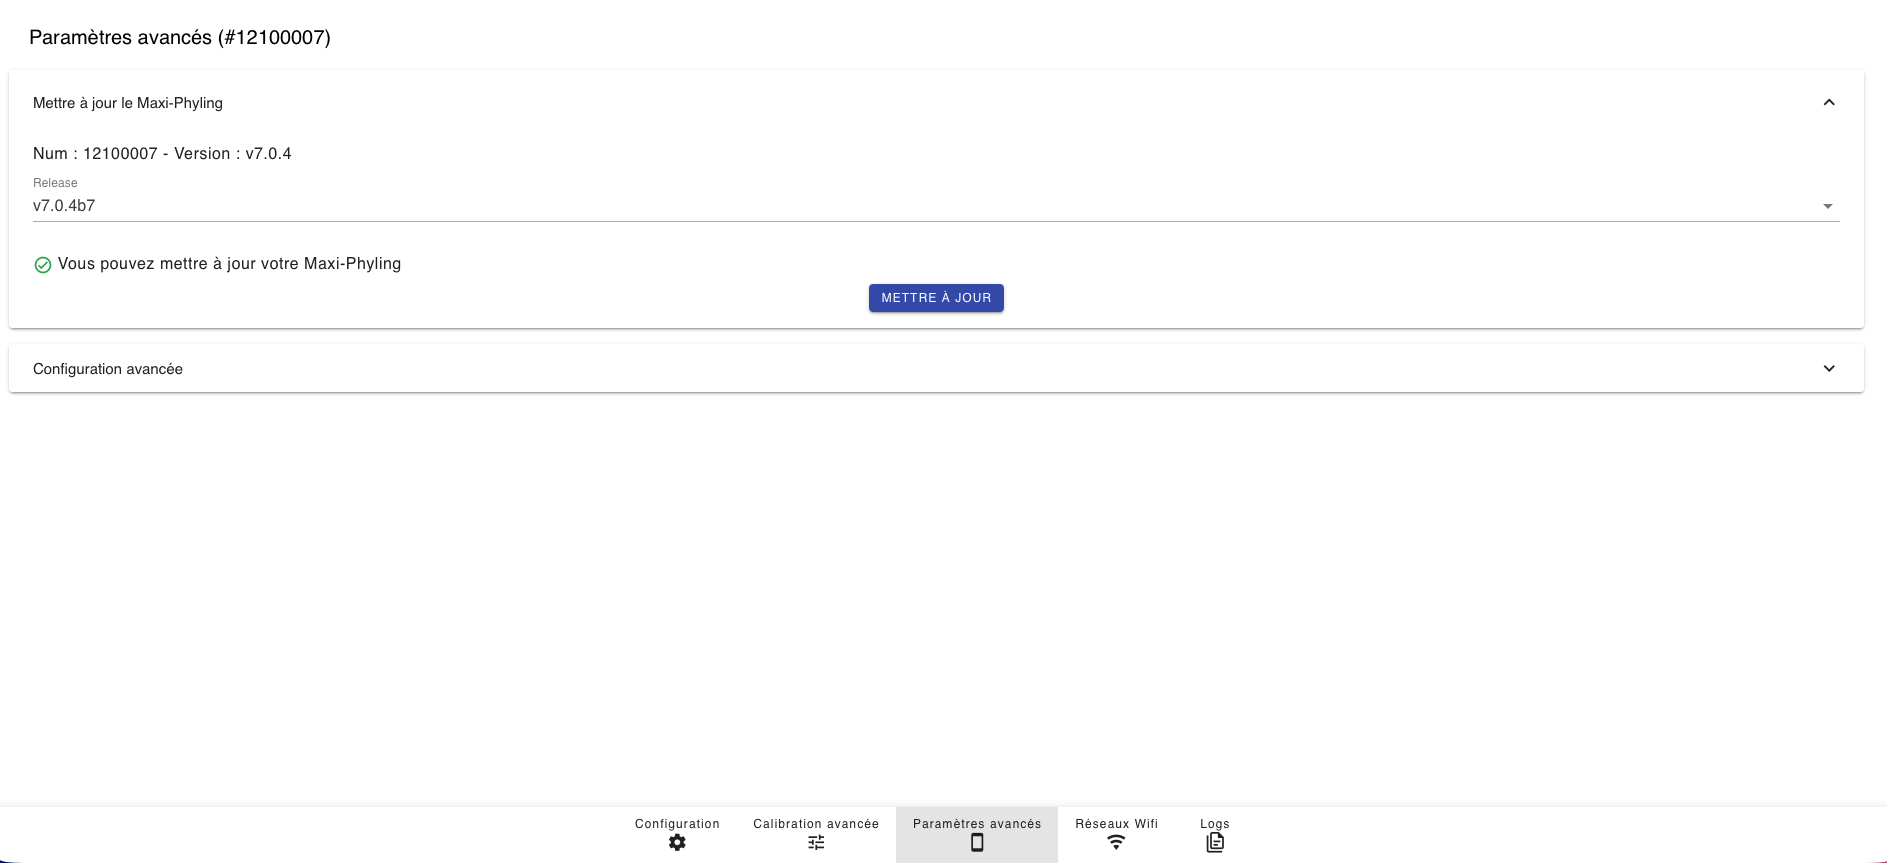
WiFi settings
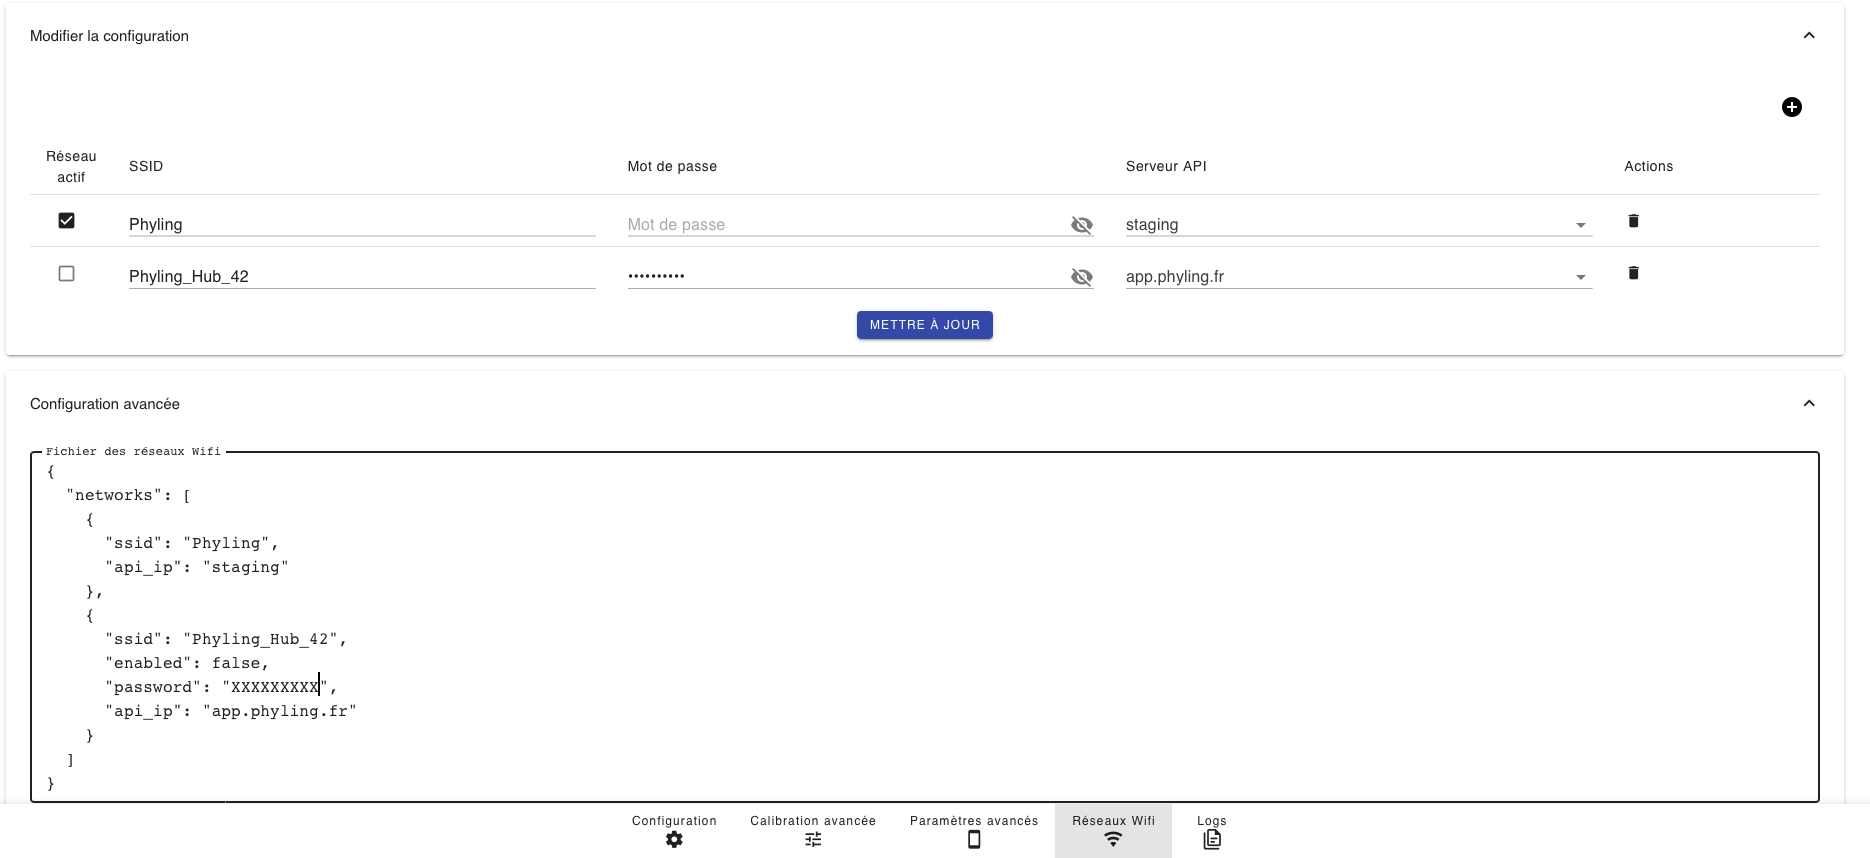
Click the ... button then Settings then Wifi Networks. To add a Wifi network, click the + button. A window appears and prompts you to enter:
- SSID: The exact name of the Wifi network
- Password: The password of the Wifi network
- API Server: to connect to the cloud application, select app.phyling.fr. Contact the Phyling team for any other address.
The Maxi-Phyling can store several active Wifi networks and will automatically switch Wifi network in case of disconnection-reconnection.
Configuration via Hot-Spot mode
Activating Hot-Spot mode
- Turn off the Maxi-Phyling
- Press the ON and REC buttons simultaneously for 5 seconds
- The LED turns purple → the Maxi-Phyling broadcasts a WiFi network
Connecting to the network
- On your phone or computer, connect to the Maxi-Phyling WiFi network
- No password required
Accessing the WiFi settings
- Open a web browser (Chrome, Safari, Firefox, etc.)
- Enter in the address bar: 192.168.1.42
- Go to the WiFi tab
- Click the + button to add a network
- Fill in the fields:
- SSID: name of your WiFi network
- Password: password of the network
- Connection address:
app.phyling.fr
- Save and confirm the update
- Restart the Maxi-Phyling
Configuration via USB mode
Activating USB mode
- Connect the Maxi-Phyling to a computer using the magnetic charging cable
- Turn off the Maxi-Phyling
- Press the ON button for 5 seconds
- The LED turns yellow → the Maxi-Phyling is recognized as a USB drive
Accessing the configuration file
- Open the file explorer (Finder, Windows Explorer, etc.)
- Locate the Maxi-Phyling folder
- Navigate to the Config folder
- Open the wifi.json file with:
- A text editor (Notepad, TextEdit, etc.) OR
- A code editor (VS Code, Sublime Text, etc.)
Modifying the configuration
Edit the wifi.json file following this template:
"networks": [
    {
        "api_ip": "app.phyling.fr",
        "enabled": true,
        "password": "MOT_DE_PASSE_DU_RESEAU",
        "ssid": "Nom_de_votre_WiFi_1"
    },
    {
        "api_ip": "app.phyling.fr",
        "enabled": true,
        "password": "12345678",
        "ssid": "Nom_de_votre_WiFi_2"
    },
    {
        "api_ip": "app.phyling.fr",
        "enabled": true,
        "password": "12345678",
        "ssid": "Nom_de_votre_WiFi_3"
    }
]
Finalization
- Save the
wifi.jsonfile - Unplug the USB cable
- Restart the Maxi-Phyling
Important points
Warning
WiFi network with an authentication portal
- WiFi networks that require a login (captive portal username/password) are not compatible
- These networks will not work with the Maxi-Phyling 2.4 GHz frequency band required
- The Maxi-Phyling supports only 2.4 GHz
- Check that your WiFi network broadcasts on 2.4 GHz On iPhone (Personal Hotspot)
- Go to Settings → Personal Hotspot
- Turn on the Maximize Compatibility option On Android (Personal Hotspot)
- Go to Settings → Mobile Hotspot
- Turn on 2.4 GHz band
Checking the connection
- Go to https://app.phyling.fr
- Log in with your username
- Check that the Maxi-Phyling appears in the Real Time tab
- Data should be synchronized live
Support
Contact: contact@phyling.fr