Real-time
Real-time
Overview
The Real-time tab lets you start or stop recordings, view data in real time, check the status of the sensors, run scenarios, and more.
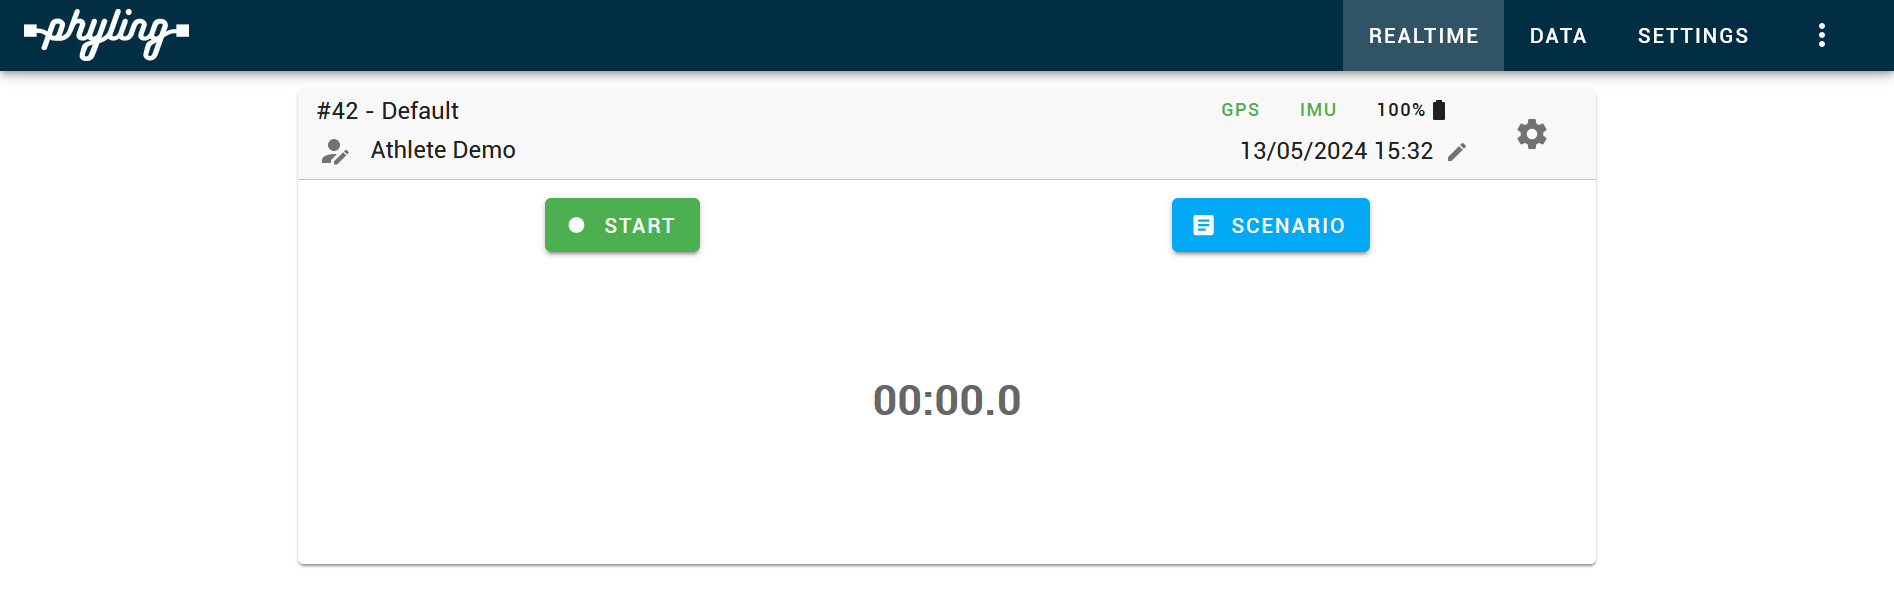
The available Maxi-Phyling devices are listed in the bottom bar of the screen. One or more Maxi-Phyling devices can be selected at the same time. For each selected Maxi-Phyling, a control panel is displayed on the screen. If the panel is greyed out, the selected Maxi-Phyling is not connected.
The status of the sensors is shown in the top banner of the control panel.
Note
If a sensor is displayed in red, it is inactive or not connected; conversely, if it is green (as here for the GPS and IMU sensors), everything is fine.
In this banner, you can also associate the Maxi-Phyling with an athlete, set the Maxi-Phyling clock, and configure the Maxi-Phyling by clicking the settings button on the right (see below).
The START/STOP button starts/stops a recording on the selected Maxi-Phyling. When only one Maxi-Phyling is selected, you can also view the data in real time. To do so, start a recording and select the variable(s) to display.
To start a recording on all the selected Maxi-Phyling devices, use the START button in the bottom bar of the screen.
Multi-user access and Maxi-Phyling locking
Several users can be connected to the platform at the same time and access the same Maxi-Phyling devices in real time. To avoid conflicts during sessions, a locking system allows a user to reserve write access to a Maxi-Phyling.
When a Maxi-Phyling is locked, only the user (or group of users) holding the lock can act on it: start or stop a recording, manage selections, change settings or change the associated athlete. The other users remain in read-only mode: they can still see the data in real time but cannot control the Maxi-Phyling.
The lock status is visible at any time thanks to the padlock icon displayed on the Maxi-Phyling panel:
- Open padlock — the Maxi-Phyling is free, everyone can act on it.
- Green closed padlock — the Maxi-Phyling is locked and you have control of it.
- Orange closed padlock — the Maxi-Phyling is locked by another user.
A Maxi-Phyling can be locked for yourself only or for a group of users. Any member of the client can lock or unlock a Maxi-Phyling, except athletes, who can only lock it for themselves. The lock is kept even if the Maxi-Phyling disconnects and reconnects (network outage, restart), which guarantees session continuity during a session in the field.
Scenario
Scenarios are predefined recordings with a protocol to follow and automated data analysis (see examples of scenarios on the Physical preparation page). Refer to the specifics of each application for the details of the scenarios. In the base version of the application, no scenario is predefined.
Maxi-Phyling configuration
In the Real-time tab, click the ... button then Settings. The configuration menu then appears as below.
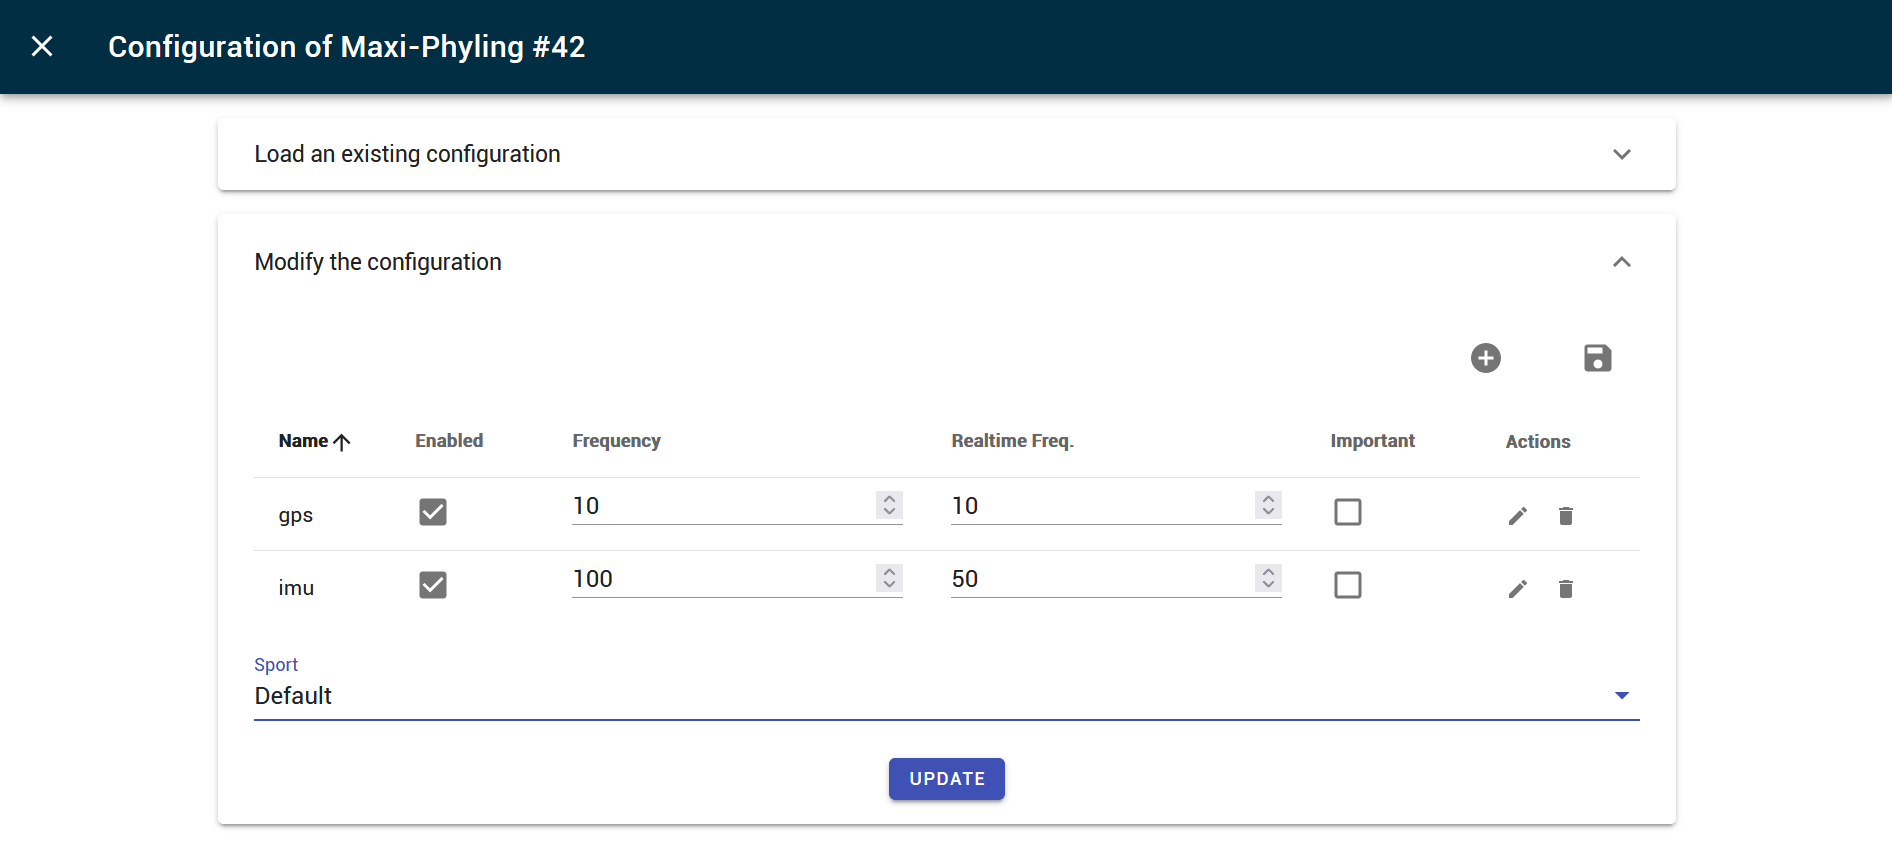
You can then define the various sensors of the Maxi-Phyling, as well as the sport used for data analysis. To add a sensor, click the + button, select the sensor from the list and fill in the required parameters.
- Mini-Phyling V2 sensor (
>= 362): Simply add aminiphyling-v2sensor. On the first connection, the Maxi-Phyling restarts and takes the specific Mini-Phyling configuration into account. - Mini-Phyling V1 sensor (
< 362): Display the advanced sensors and select your specific sensor (crankset, oar, etc.). Be careful: the full name with all the leading zeros before the number is important. - Heart rate sensor of the Polar type: The Hub must detect the sensor in order to find its characteristics and send them to the Maxi-Phyling. Be sure to switch on the sensor next to the Hub during the procedure.
- Wired sensor: Connecting it is not enough; you must enter the sensor type and the connector used in the configuration.
- Wired synchronisation: Add the desired synchronisation module as if it were a sensor in the Maxi-Phyling configuration.
A sensor can be defined as "Important". This means that it is important for the measurement that the sensor is connected and working. The Maxi-Phyling LED blinks as long as all the sensors defined as important are not connected. For example, if the GPS is defined as important, the LED will blink until there is a reliable GPS signal.
Saving configurations
Once a configuration has been made on a Maxi-Phyling, it can be saved in the Hub so that it can be reloaded later. For example, if an athlete has a configuration, you can save it under their name and then reload it when they use the Maxi-Phyling. The list of saved configurations is available in the Configurations section of the Settings tab.
Calibration
The sensors of a Maxi-Phyling can be calibrated using a predefined calibration procedure by clicking the settings button on the right in the Maxi-Phyling control panel. Once the sensor to calibrate and the calibration type have been chosen, just follow the instructions displayed on the screen.
The calibration is then available from the Maxi-Phyling Settings menu (in the Real-time tab, click the ... button of a Maxi-Phyling, then select Settings).
The calibration of a recording is defined by a json file, which generally looks like the file below:
{
  "<moduleName>": {
    "<varName>": {
      "coef": 0.333,
      "offset": 0
    }
  }
}
where moduleName is the name of the sensor (for example imu) and varName is the name of the variable to calibrate (for example acc_x). The values of and are applied according to the following formula to convert raw data into calibrated data:
that is:
3-axis calibration
In some cases, such as for the calibration of IMUs or of the PI3D pedals, is a 3x3 matrix and is a vector of size 3, as here for the calibration of gyro data:
{
  "imu": {
    "gyro": {
      "coef": [
        [
          1,
          0,
          0
        ],
        [
          0,
          1,
          0
        ],
        [
          0,
          0,
          1
        ]
      ],
      "offset": [
        -1.737,
        1.473,
        1.471
      ]
    }
  }
}
The same calibration formula then applies, but to vector data .
High Range Gyro calibration
In the case of a simple rotational movement, the "High Range Gyro" calibration extends the angular velocity measurement range by combining gyro and accelerometer data. The calibration has a different form:
{
  "imu": {
    "high_range_gyro": {
      "coef": 299.08,
      "col_acc": "acc_x",
      "col_gyro": "gyro_y"
    }
  }
}
The value of is used to recompute the angular velocity col_gyro beyond the saturation value (typically 2000 deg/s) using the acceleration col_acc according to the following formula:
where is the acceleration filtered with a moving average.
In the particular case where "coef": null,, the value of is computed directly from the recording data.
Phyling-LTE specifics
Phyling-LTE devices (sensors with LTE-M connectivity) have characteristics related to the nature of the long-range network link.
Behaviour after a network outage
When a Phyling-LTE device regains its connection after a network interruption, it sends back the data recorded locally during the signal loss. In the real-time interface (live graphs), this older data does not appear: only the most recent measurements are displayed, which ensures a smooth experience without "jumps back" of the time cursor. Gaps in the live graphs are therefore normal and expected.
However, the complete recording remains intact. When exporting or viewing the full analysis of your session, all the data (before and after the outage) is present and correctly ordered.
Example: you are in a session in an area without network coverage. The device keeps recording. When it reconnects, the live graph does not go back in time, but your exported recording file contains the complete session.
Command responsiveness (start / stop)
To save battery, a Phyling-LTE device may connect to the network only at intervals. A command sent from the application (start/stop a recording, change a setting) may therefore take a few seconds longer to be applied than on a permanently connected Maxi-Phyling.
During this short delay, the button displays the "Starting" or "Stopping" state: this is normal. The waiting time is automatically adapted to the configured responsiveness of the device — there is no need to click again. If no response arrives within the delay, the application resynchronises the device state.
Software update
Go to this page: Maxi-Phyling settings
WiFi settings
Go to this page: Maxi-Phyling settings