Maxi-Lab
Maxi-Lab
Overview
The Maxi-Lab is a versatile acquisition unit that combines the capabilities of the Maxi-Phyling with advanced wired connectivity. It records all your data at high frequency and lets you connect any type of sensor, wired or wireless. Its rugged design makes it easy to use in a laboratory or field environment.

Technical specifications
| Specification | Value |
|---|---|
| Dimensions | 140x110x30 mm |
| Weight | 350g |
| Battery life | Mains power or external USB-C battery |
| Connectivity | Wifi, Bluetooth (BLE), wired with 1 Ethernet port, 3 analog RJ-45 ports and 4 jack inputs (2 sync and 2 I2C) |
| Sampling rate | Up to 1kHz |
| Onboard sensors | 3-axis accelerometer, 3-axis gyroscope, multi-band GPS (10Hz) |
Connectors
A large number of sensors can be plugged into the back of the Maxi-Lab.

The three RJ45 sockets on the right give access to the Maxi-Lab measurement channels (ADC). As shown in the diagram, each socket can read some of the eight available measurement channels.
Quick start
Press the ON/OFF button to turn it on; the LED turns green. To start a recording, press the REC button; the LED then turns blue.
Once turned on, the Maxi-Lab can be fully controlled with the Phyling application from a Hub or a Maxi-Hub.
Power supply
The Maxi-Lab is powered via a USB-C cable or via the magnetic power cord provided by Phyling. A white LED lit next to the charging connector indicates that the Maxi-Lab is charging; it turns off when the unit is fully charged.
Internet connection
Use an RJ45 cable between the Maxi-Lab and your Wifi router to get Internet access while staying connected to the local Wifi network.
LED color code
An LED gives all the information about the state of the Maxi-Lab:
- ⚪ White: the Maxi-Lab is initializing, shutting down, or is in Recovery mode (after a recording).
- 🟢 Green: the Maxi-Lab is ready to start a recording
- 🔵 Blue: the Maxi-Lab is recording data
- 🟣 Purple: the Maxi-Lab is in Hotspot mode
- 🟡 Yellow: the Maxi-Lab is in USB mode
- 🔴 Red: there is a problem, indicated by the number of blinks before shutdown
- x2: Configuration error (invalid module, badly formatted file, etc.)
- x3: GPS not working (if it is not essential, disable it or set
"important": falsein its configuration) - x4: SD card full: you can empty it manually in USB mode or in Hotspot mode
- x5: Settings file error (Device, Wifi, Calibration files, etc.)
- x6: An error occurred during an update (green blinking if it succeeded)
- No blinking: Other problem
- Green blinking with 0.5s off-periods every 3s: one of the sensors defined as "important" is not connected (see in the settings how to define a sensor as important)
- Red blinking of 0.5s every 5s: less than 15% battery remaining
- Red at power-on before initialization: there is an initialization error, you need to turn the Maxi-Lab off and on again
Powering on and recording
The Maxi-Lab has 2 buttons: an ON/OFF button and a REC button.
- To turn the Maxi-Lab on or off, hold the ON/OFF button for 0.5s
- To start or stop a recording, press the REC button
- A 3s long press on both the ON/OFF and REC buttons while the Maxi-Lab is off switches it to Hotspot mode
- A 3s long press on the ON/OFF button while the Maxi-Lab is off switches it to USB mode
Recovery mode
Recovery mode lets you retrieve the data of a Mini-Phyling that was unable to send all its data to the Maxi-Lab.
Conditions for activating Recovery mode:
- The Maxi-Lab and the Mini-Phyling units are at least on version v6.6.6.
- The Mini-Phyling unit(s) have "Recovery" mode enabled in their configuration (
"useRecovery": trueafteruse_ble).
How it works: at the end of a recording, the Maxi-Lab switches to Recovery mode (WHITE LED), and all the Mini-Phyling units that have Recovery mode enabled send their data to the Maxi-Lab. Once the data has been received, the Maxi-Lab exits Recovery mode and returns to normal mode (GREEN LED).
During Recovery mode, if you press the REC button, the Maxi-Lab returns to normal mode (GREEN LED) and the Mini-Phyling units stop sending their data.
Inertial measurement unit (IMU)
The IMU returns 6 values (accelerations and angular velocities for the 3 directions). The axes of the unit are defined in the following diagram. For all applications where positioning is important (notably rowing and kayaking), make sure to place the unit with the X axis pointing in the direction of travel.

Data retrieval
Data is downloaded automatically to the Phyling Hub when the Maxi-Lab connects to it and a recording is finished. It appears in the "New data" table (see the Data tab). This data must then be associated with one or more athletes, optionally adding other information such as an exercise and a comment.
USB mode & Cloud transfer
With the Maxi-Lab turned off, press and hold the ON/OFF button until the LED turns yellow. The Maxi-Lab is then in USB mode. Simply connect the Maxi-Lab power cord to a USB-A port and the computer will detect the Maxi-Lab as a USB drive. You can access all the recordings stored on it. Go to the data/ folder to find a recording named after its start time.
To exit USB mode, restart the Maxi-Lab.
To import an activity into the Phyling Cloud application, open the application in a web browser at app.phyling.fr and log in with your username and password. In the application, go to the "Data" tab, click the "Import" button above the data table and select the txt file of the recording to import.
Configuration
The Maxi-Lab can be configured using several configuration files stored in its memory and accessible from Hotspot mode or via the application. We recommend configuring from the application, which is detailed here.
Calibration
The calibration of the Maxi-Lab sensors is defined in a configuration file. Find more information about the calibration file, the calibration procedure in the application and the different types of calibration here.
Hotspot mode
To configure a Maxi-Lab, and in particular the Hub it must connect to, there is a Hotspot mode. With the Maxi-Lab turned off, press the 2 buttons ON/OFF and REC at the same time for 3s. The LED turns purple. The Maxi-Lab then broadcasts a Wifi network named after itself and its number (for example: Maxi_Lab_42). Connect with the password "hellophyling" then type the address http://192.168.1.42 in a browser to access the configuration interface.
Wifi network configuration
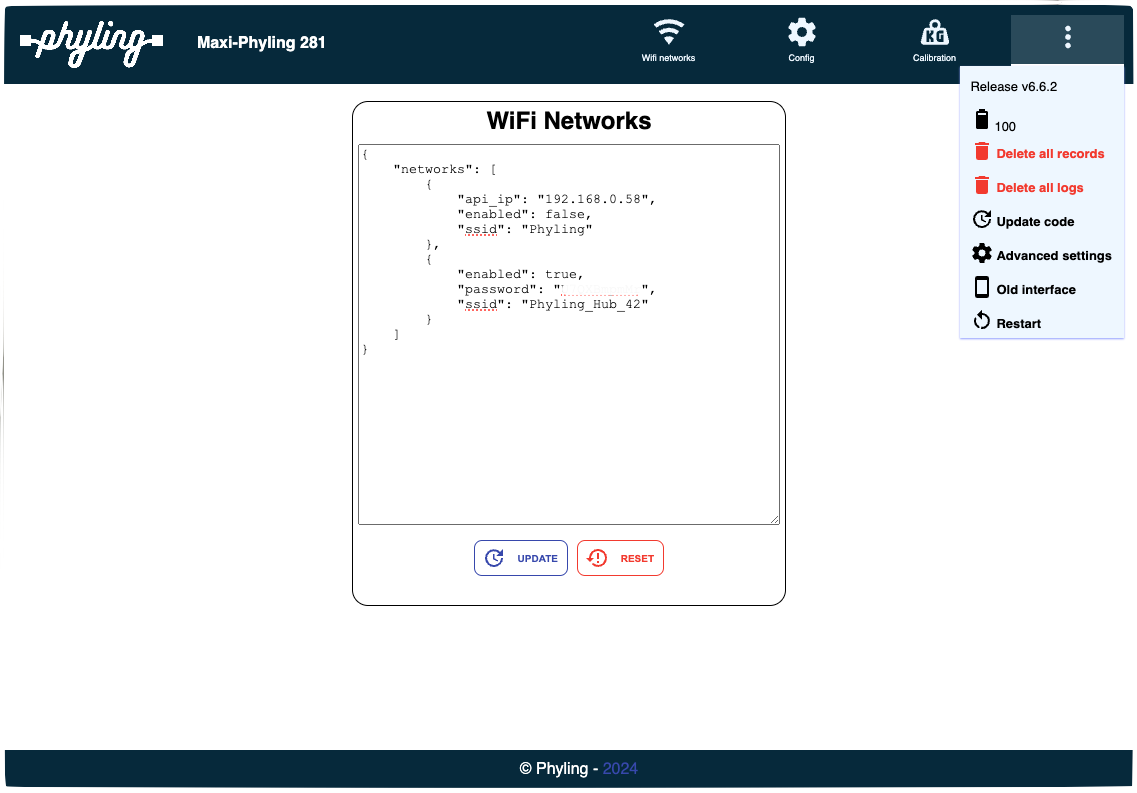
Maxi-Lab units must connect to the Hub's Wifi network to transmit their data and make it visible in the application. The networks they are allowed to connect to are listed in the Wifi Networks section of Hotspot mode. To add a network, add a new network to the list or edit an existing one. Don't forget to update before leaving the interface.
Changing the Maxi-Lab configuration
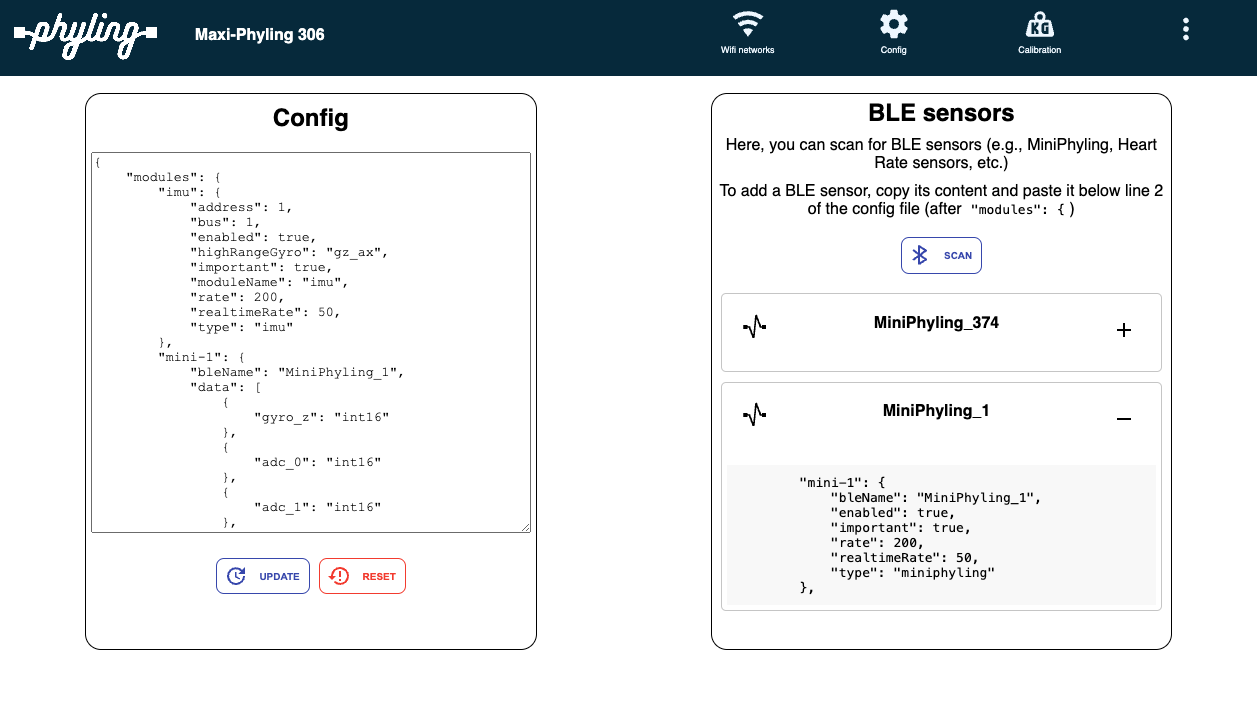
Each Maxi-Lab has its own configuration with a list of modules (IMU, GPS, wired sensors, heart rate, etc.). In Hotspot mode, you can change the configuration in the "Config" menu.
Warning
This configuration mode using the raw file is risky: some configurations may not be understood by the Maxi-Lab and prevent it from restarting properly. Before changing the configuration, contact the Phyling team to avoid applying an incorrect configuration.
Adding a heart rate sensor or a Mini-Phyling to the configuration
To add heart rate sensors or a Mini-Phyling, use the Hotspot / Config menu. You can run a Bluetooth sensor scan and then simply copy/paste the configuration of the module to add.
Warning
For some heart rate sensors, the Maxi-Lab may not detect their name. In this case, the sensor will be called "NO NAME", and you will only see its MAC address.
Warning
Make sure to follow the JSON format in the configuration.
Clearing the Maxi-Lab memory
Even once the data has been downloaded to the application, it remains stored in the Maxi-Lab. To avoid filling up the memory, it is best to delete all data regularly. To do so, click the "Delete all records" button; the LED turns white. Then wait for it to turn purple again. This operation can take a very long time if there is a lot of data.
Warning
For your Maxi-Lab to work properly, do not modify the other tabs of Hotspot mode.
Update via Hotspot mode
Updating the Maxi-Lab brings fixes and new features. Update files are made available to Managers as soon as they are released on the Cloud application.
Note
Updating a Maxi-Lab can also be done directly from the application in the Real time tab (see Maxi-Lab configuration).
On the Phyling Cloud application
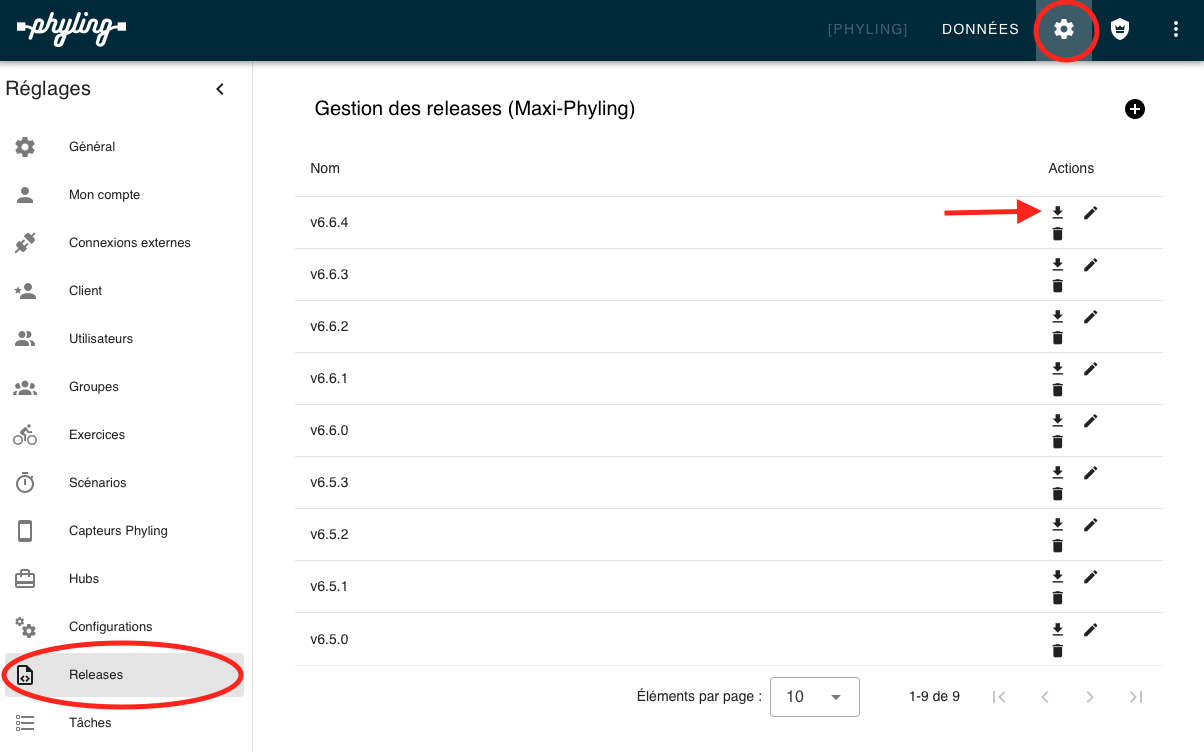
The update is available in the Settings tab, "Releases" menu. To get the latest version, download the version with the highest numbers (for example, version v6.6.4 is more recent than version v6.6.3). A .bin file is available in your downloads folder.
On the Maxi-Lab Hotspot mode
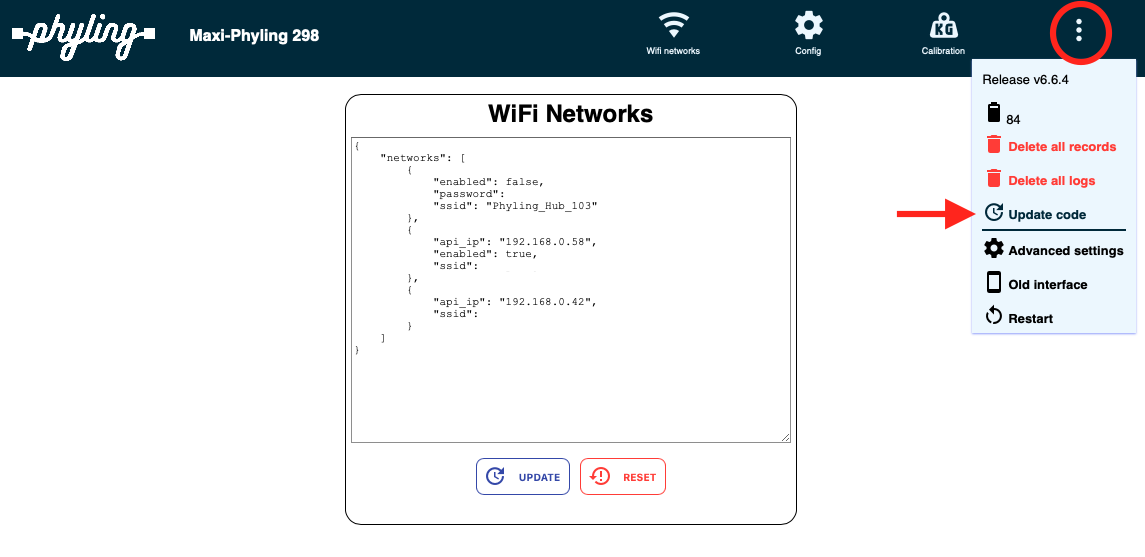
- Click "Update code".
- Import the .bin update file.
- The Maxi-Lab updates and restarts automatically.